How to Work Shaped Pieces — Increases & Decreases
Shaped pieces — like hearts or earrings — are worked as the outline itself, not a rectangular band. Tsubuzukan shows these on a numbered chart where the numbers are the stitching order. Here is the foundation plus the increases and decreases that create the shape.
Shaped pieces use brick stitch
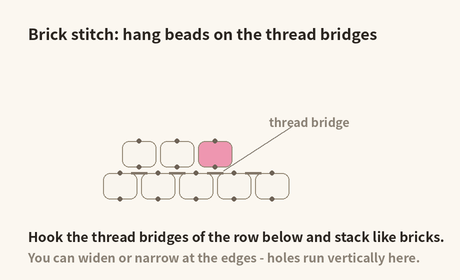
Shaped patterns are worked in brick stitch: you pass the needle under the thread bridges between the beads of the previous row and stack beads like bricks. Unlike peyote, you can freely add or drop width at the edges, so you can build an outline.
1. Add a stopper bead
About 15 cm (6 in) from the end of the thread, string one bead in a color not used in the pattern and pass through it again to lock it. This stopper bead keeps your first beads from sliding off; you remove it at the end.

2. Make the ladder foundation
- String two beads of the widest row (beads ①…, outlined on the chart), then pass through both again to make a loop — pull tight and they sit side by side.
- From bead 3 on, pick up one bead and loop it to the previous one. Join the whole widest row into a ladder foundation — your starting line.


If the base has an odd number of beads, enter the first bead from below; if even, from above. Either way the thread ends up exiting the top of the last bead, ready for row 2. From row 2 on, odd and even counts work exactly the same.

3. Work the top and bottom halves in number order
- Only at the start of each row, pick up two beads together, pass under the first bridge from the edge, and go up through the second bead.
- After that, one bead at a time: pick up, pass under the next bridge, back up through the bead - repeat.
- Return to the foundation for the bottom half. The numbers are always the threading order.


4. Increase (add one bead at the edge)
To widen the edge, increase: put two beads on one bridge - work a bead, then add another on the same bridge. The edge grows by one bead.

5. Decrease (narrow the edge)
To drop one bead, start the row on the next bridge in (skip the outer bridge). The edge steps in by one bead.
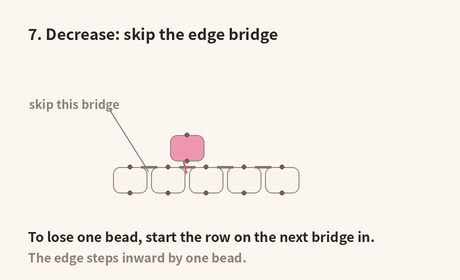
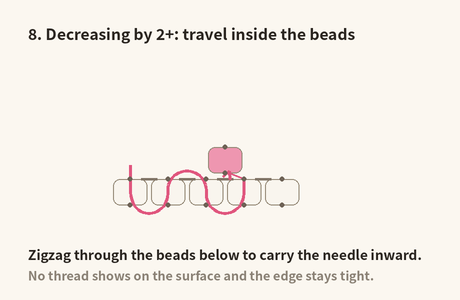
To drop two or more beads, take care: starting straight from an inner bridge leaves a long, loose thread at the edge. Instead, weave through a few beads of the previous row to move your needle to the target spot, then start stitching from that bridge. The thread stays hidden and the edge stays firm.
Tsubuzukan's stitching-order charts already include these increases and decreases in the numbering. If the numbers seem to jump, just check bead by bead which bridge each one attaches to. You only stitch inside the outline — background beads are not strung.
6. Finishing
Weave the tail through nearby beads, tie two or three half-hitch knots on the bridges, and trim. For attaching ear wires and other findings, see Joining Parts & Attaching Findings.